One thing about getting back into iOS development is that in the intervening two years or so, Xcode and the iOS SDK has changed quite a bit, and this has meant I’ve needed to try and overcome some preconceptions about how to approach certain development tasks. Automatic Reference Counting (ARC) has greatly simplified retain/release logic, and Storyboarding is a better solution to visual app development than the old Interface Builder/NIB methods. Well, that’s what Apple would have you believe, and in the last couple of weeks I’ve flipped back and forth looking for solutions to development problems. Is it King’s New Clothes, or is there actually something to these new fangled approaches?
Whilst reviewing the new SDK and Xcode features, Unit Testing caught my eye. New projects now have the option of creating a separate build target for Unit Tests, and of course you can create a new build target for existing projects to encapsulate Unit Tests. What are Unit Tests I hear you ask? Good question, glad your paying attention and eager to learn.
## Testing Your Assumptions
Unit tests are good development practice. It’s easy and fun to hack away at code, assuming that everything is working well and the design is sound, just because things pop up on the screen as you expect them. But sooner or later you start to refactor your code, and refine your design. With anything more than a trivial amount of code, you soon start to forget the whys and wherefores of implementation decisions, and the knock on effect that has on code quality. And this is where Unit Testing comes in. If you write test code to exercise production code, you set and validate expectations about how the code works. Testing often ensures that new and changed features don’t break existing expectations. When you refactor the underlying production code for optimisation or maintainability, you have a way of checking that outcomes remain the same, rather than simply poking the user interface with a sharp stick to see if it squeals.
## Driving Development Through Testing
If you are not used to using Unit Tests, then Test Driven Development (TDD) is going to turn your notion of writing code on its head. No longer are you free to write production code, then worry about the tests later. With TDD, you don’t write a darn thing without a test that proves you need to write code. So how do we go about it?
1. Write a test that fails
2. Write production code that passes the test
3. Refactor code that smells bad into something more testable, maintainable, or elegant
4. Now write another test that fails
Or, to put it in its most simple terms:
1. Red
2. Green
3. Refactor
4. Repeat
We can show an example with a simple scenario.
> 1. I want a container for objects
> 2. That operates as a stack
> 3. Such that I can push objects onto the stack
> 4. And I can pop objects off the stack
> 5. And I can peek at the topmost item without affecting the stack
> 6. And that the stack is good for at least 10 concurrent objects
### Creating an `OCUnit` stub
So, lets turn that into code with the help of `OCUnit`. I’m not going to go into the nitty gritty of how to create test modules, you can find that easily elsewhere on the net or check the Apple documentation. One thing that I do after asking Xcode to create a new *Objective-c test case class* is move the `@interface` block from the `.h` file into the top of the `.m’ and then remove the `.h` file. You aren’t going to need it.
#!objectivec
#import
@interface DMStackCollectionTests : SenTestCase
@end
@implementation DMStackCollectionTests
@end
Ok, so that’s the first bit of code. You can compile that, although it won’t do much for you. Try a Product -> Test (⌘-U) and see what you get. Well, at least it compiles. If you still have the unit test stub created by Xcode’s New Project, you’ll get a test failure because they put a deliberate failing test in the template. But you can remove that, as we won’t be needing that.
### Code Red
So what next? Remember, *Red, Green, Refactor*? We are at green at the moment – unit tests that pass. So we need to start by writing a test that fails.
#!objectivec
@implementation DMStackCollectionTests
-(void) testThatICanCreateACollectionThatOperatesAsAStack {
DMStackCollection *stack = [[DMStackCollection alloc] init];
STAssertNotNil(stack, @”stack could not be created”);
}
@end
Ok, so a simple two line test that asks if a stack can be created. We’ve responded to points 1 and 2 in our requirements (a collection can be created that operates as a stack). Whilst we’ve not implemented any stack like behaviour, or even a way of storing objects, we’ve written a test to validate the requirements.
If you try and compile this, you’ll get a failure. In fact, you don’t need to compile, because Xcode will be showing error tips because it can’t find the type you are requesting on the first line of the test. But we’ve now moved from the green phase back to red, a failing test. The only way to fix that is to write some production code.
Here is your `DMStackCollection.h`:-
#!objectivec
#import
@interface DMStackCollection : NSObject
@end
And here is your `DMStackCollection.m`:-
#!objectivec
#import “DMStackCollection.h”
@implementation DMStackCollection
@end
Thats pretty simple. Does it get us back to green? Not quite, as we need to include the header file into our `DMStackCollectionTests.m` file. I’ll let you figure that out, and then you can compile and run the tests (⌘-U, not ⌘-R).
### Code Green
We’ve written just enough code to make the test go from red to green. We’ve not tried to be clever and write stuff that is not required to meet the requirements, or pass our test. There are no convenience methods, as they are not part of the requirements. Maybe they will later on, but why create work for yourself now? Notice that the requirements don’t even suggest that we need to be able to create multiple instances of our stack – this could be a singleton as far as the requirements are concerned. In a way, we’ve already exceeded what has been asked of us, as this is not a singleton and would require more code to create a singleton than one that supports multiple instances. Do you need a test to enforce the singleton behaviour, or a test to enforce multiple instances? I’ll leave that to you to decide.
But moving on, we can now look back to our requirements and see what comes next – *Such that I can push objects onto the stack*. We need a test to see if we can push an object onto the stack.
#!objectivec
-(void) testThatICanPushAnObjectOntoTheStack {
DMStackCollection *stack = [[DMStackCollection alloc] init];
[stack push: @”something for the stack”];
STAssertEquals(stack.count, 1, @”stack should contain 1 object”);
}
We are back to red, because we can’t compile as there is no `push` interface, and no property `count`. Ok, so we need a method to push an object:-
#!objectivec
-(void)push:(id)object {
}
Add this to your `@implementation` a matching declaration in the `@interface`, as this needs to be a public interface. Also add a property to your `@interface`:-
#!objectivec
@property (nonatomic, readonly) NSUInteger count;
We can now compile, but our tests still fail. Although we wrote enough to be able to compile, we didn’t write enough to make the test pass. Now its over to you. I’m not going to tell you how to write production code, I’m here to tell you how to write tests. You could cheat, and have count always return 1, as at least the test will pass. I’ll leave it to you to work out if you can leave that bit of coding till later.
### Refactor
Before we move on with more tests, we have an opportunity to do a bit of refactoring, this time on the tests. We have two test, and the first line of each is identical. `OCUnit` supports methods called `setUp` and `tearDown` that can be used to configure our test environment, and we’ll just make a few changes to remove the duplicated code.
#!objectivec
@implementation DMStackCollectionTests
{
DMStackCollection *stack;
}
-(void)setUp {
stack = [[DMStackCollection alloc] init];
}
-(void)tearDown {
stack = nil;
}
-(void) testThatICanCreateACollectionThatOperatesAsAStack {
STAssertNotNil(stack, @”stack could not be created”);
}
-(void) testThatICanPushAnObjectOntoTheStack {
[stack push: @”something for the stack”];
STAssertEquals(stack.count, (NSUInteger) 1, @”stack should contain 1 object”);
}
@end
Notice that I’ve create an ivar for the stack instance, and that its been assigned an instance in the `setUp` method. I’ve also assigned it to `nil` in the `tearDown`, so that we are working with a fresh instance for each and every test. Thats right, `setUp` is called before each and every test, and `tearDown` is called after each and every test. The test methods now are working on the assumption that the stack instance is created in the `setUp`, and that its always a fresh and empty stack. Do we have a way of knowing if the stack is empty when first created? Well yes, because our second test adds one object and then tests to see if the stack only contains one item, so there is no need for an explicit test for an empty stack, although I’ve nothing against to adding one if you think it makes things clearer.
Our next requirement is *and I can pop objects off the stack*, so we need a test:-
#!objectivec
-(void) testThatICanPopAnObjectOffTheStack {
NSString *expectedStackItem = @”Our First Stack Item”;
[stack push: expectedStackItem];
NSString *actualStackItem = [stack pop];
STAssertEqualObjects(expectedStackItem, actualStackItem, @”popped item should be same as pushed”);
STAssertEquals(stack.count, (NSUInteger) 0, @”stack should have no items after pop”);
}
You’ll be back to red now, as you’ve yet to implement the `pop` interface, so you need to go do that. You are probably going to need to make sure that you are actually storing objects somehow, as pop needs to pass back an identical object. Our requirements don’t state if this should be the same object, or just an identical object. Go read up on object equality in Objective-C if you are not sure of the difference, then decide what is appropriate. You may need to adjust `STAssertEquals` to `STAssertEqualObjects` depending on your interpretation. One thing for certain is that there should be no items left on the stack after the pop.
Our next test is to meet requirement 6, which is *and I can peek at the topmost item without affecting the stack*. Peek means that we should return the topmost item on the stack, without popping it. We’d reasonably expect the object to identical to the last one added, and for the item count to remain the same after the peek.
#!objectivec
-(void) testThatICanPeekAtTheTopMostObjectWithoutAffectingTheStack {
NSString *expectedStackItem = @”Our Topmost Stack Item”;
[stack push:expectedStackItem];
NSUInteger countBeforePeek = stack.count;
NSString *actualStackItem = [stack peek];
STAssertEqualObjects(expectedStackItem, actualStackItem, @”peeked item should be same as last pushed”);
STAssertEqualObjects(countBeforePeek, stack.count, @”item count should not change after peeking”);
}
Back to red again, so once more off you go to production code implementation, and create the peek interface so that we go back to green with a passing test. You’ll notice that I’m leaving it to you to determine how to implement the production code. This is an important separation of logic which you’ll need to achieve. Don’t make the tests too dependant on the code your testing. Allow some ambiguity. If you do, you’ll be more likely to create more robust tests that leads to more robust code. Don’t feel that what I’m offering are the only tests that you could write, but be mindful not to allow the implementation to creep into fanciful areas that are not part of the requirements. The more production code you are tempted to write, the more you have to maintain, and that means more tests.
At last we reach the final requirement, that *the stack is good for at least 10 concurrent objects*. And so our final test should look something like:-
#!objectivec
-(void) testThatTheStackCanHandleAtLeast10ConcurrentObjects {
NSUInteger itemCount;
for(itemCount = 0 ; itemCount < 12 ; itemCount++) { [stack push: [NSString stringWithFormat:@"Item %d", itemCount]]; } STAssertEquals(stack.count, itemCount, @"number of objects on stack should equal 12"); NSString *objectFromStack; while ((objectFromStack = [stack pop]) != nil) { itemCount--; NSString *expectedObject = [NSString stringWithFormat:@"Item %d", itemCount]; STAssertEqualObjects(objectFromStack, expectedObject, @"popped item should be same as pushed"); } STAssertEquals(itemCount, (NSUInteger)0, @"all items should have been popped"); } If you've implemented everything else as required, this last test should pass with flying colours without you needing to add any production code. If you are at green, then well done for passing the test! If you've chosen to implement the stack in the same way I did, you'll have only 10 lines of code (inside the implementation scope of all methods). The stack is really a trivial implementation, but the test code is more extensive. There is certainly more than one way to implement a stack, and our test code as its structure doesn't expect any particular implementation. It only requires that the public interface meets up with the users requirements. When it came to reviewing the production code, I could only see one place that I could refactor, but the difference was trivial. It might save me a moment at some later stage should the internal implementation of the stack be refactored by some down the line change requirement. We can see from this example that `OCUnit` can certainly help with writing unit tests. There might have been many more user requirements that would have led us to more tests and more complex production code, and this is where OCUnit might start to be less than ideal. Each test module is a test unit, and if we are testing complex objects, the flat nature of the OCUnit tests might be too restrictive. Sure, we could start breaking test across multiple modules, and with any testing toolset and sufficiently complex objects this might be a necessity, but I'm inclined to think that the single context depth and someone munged naming convention for test cases is overly restrictive. ## An Alternative Behaviour Driven Development One way to test this theory is to look at alternatives. This is where my investigation expanded out into Behaviour Driven Development (BDD). First principles are the same - first write a test, then implement a test, then verify the test result. But the way in which we specify the test is more expressive with BDD, and better aligns with the user requirements. There is no formal language definition for BDD, but there is an intention that a common language be formed within a project team, so that stakeholders and implementors use the same language to describe the requirements and implementation detail. ### Telling a Story, BDD Style BDD uses user stories to describe the features of a module under test. Stories describe the user requirement and a number of scenarios that specify the expected behaviour.
Story: Stack Collection


In order to represent a collection of objects that operate as a stack
as a developer
I want to push objects onto the stack
and pop objects off the stack
and peek at the topmost object on the stack without affecting the stack
and the stack must handle at least 10 concurrent objects


Scenario 1: Create a stack collection
Given a class representing a stack collection
When I create a new stack
Then the stack should exist


Scenario 2: Push an object onto the stack
Given a newly created stack
When I push an object
Then the stack should contain one object


Scenario 3: Pop an object off the stack
Given  a newly created stack
And I push an object onto the stack
When I pop the object off the stack
Then the object should match the object I pushed onto the stack


Scenario 4: Peek at the topmost object on the stack
Given a stack with one object
When I peek at the topmost object on the stack
Then the stack should contain one object


Scenario 5: The stack should handle at least 10 concurrent objects
Given a newly created stack
When I push 12 objects onto the stack
and I pop 12 objects off the stack
Then the objects should be identical to those pushed in last in, first out order
And the stack should no longer contain objects
Wow, that was a little more long winded, but it was pretty much plain English, and if you look closely, its remarkably close to what we implemented using OCUnit tests earlier, albeit in pseudocode form.
In the Ruby world, a tool called [cucumber](http://cukes.info) allows you to write user stories as defined above, and link them to tests written to conform to the framework called [RSpec](http://rspec.info). Unfortunately I’ve been unable to find a viable implementation of Cucumber for Objective-C – there are some way of running the Cucumber command line tools but nothing integrated enough to make me want to use it for anything other than an academic exercise.
### Defining Behaviour With Specifications
In Rspec, we use a nested framework
* describe “what I want”
* context “the context I am in”
* it “should do something”
* context…
`describe` and `context` are actually synonyms, but are used to define the structure of the specification. You can have one or more `it`s within a `context`, and one or more `context`s within a `describe`.
RSpec is for the Ruby langauge, so we need to find a framework for Objecti-C that supports Rspec style specifications, plus helpers to implement the tests.
After a little searching, I settled on [Kiwi](https://github.com/allending/Kiwi/wiki) as a suitable BDD framework for Objective-C.
### Getting the Little Birdy to Do Your Bidding
Let’s take a look at how we might write a BDD specification for Kiwi:-
#!objectivec
#import “Kiwi.h”
SPEC_BEGIN(DMStackCollectionSpecs)
describe(@”with a stack collection”, ^{
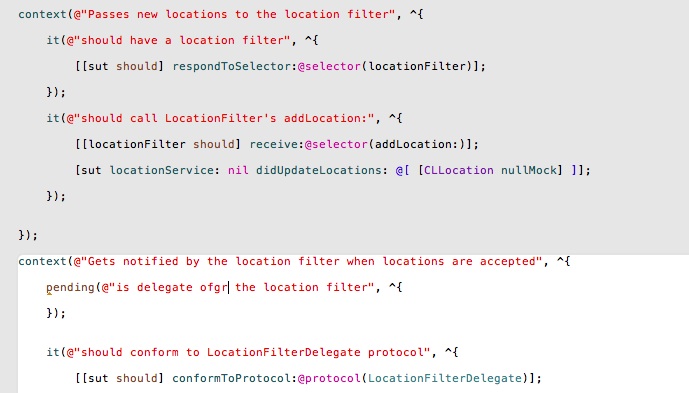
context(@”when creating a new collection”, ^{
pending(@”the collection should exist”, ^{
});
});
context(@”pushing an object onto the stack”, ^{
pending(@”the stack count should be one”, ^{
});
});
context(@”popping an object off of the stack”, ^{
pending(@”the popped object should be the same as pushed”, ^{
});
});
context(@”peeking at the topmost object on the stack”, ^{
pending(@”the popped object should be the same as the last pushed”, ^{
});
pending(@”the stacks object count should be unaffected by peeking”, ^{
});
});
context(@”the stack should contain at least 10 concurrent objects”, ^{
pending(@”add objects, compare after popping and check stack count”, ^{
});
});
});
SPEC_END
If you want to try this at home, you’ll need to go and [install Kiwi into your project](https://github.com/allending/Kiwi/wiki/Getting-Started-with-Kiwi-2.0) which will take a few minutes, but hopefully you’ll see from above that we’ve successfully interpreted our BDD style requirements into a test specification.
Kiwi relies heavily on the C Preprocessor macros supported by Objective-C to give it its coding style. It’s using Objective-C blocks to encapsulate each layer of the specification, but don’t worry if you are not too familiar with Blocks, as you won’t need to learn much to get on with Kiwi.
We start our specification using the `describe()` macro which sets out the broad case that we are implementing. Nested within that is one or more `context()`s which allow us to further describe the area of functionality our specification is dealing with. Remember `describe()` and `context()` are synonyms, so it doesn’t matter which order you use them in, but `context()` within `describe()` is the convention. Nested within `context()`s you can have as many further contexts as you like, to whatever depth suits your purpose (although you may wish to split specs into separate modules if they get too large – or indeed refactor your production code to simplify the units under test).
The actual tests are performed in `it()` blocks – these are the specific expectations you are looking for. Note that you can’t nest `it` blocks. In our outline code above, you’ll notice that I’ve used the `pending()` macro instead. `pending()` blocks are untested expectations – there will be no failure generated even if they include code, because the code is not executed when the tests are run. You will however see compiler warnings (and editor warning tips) that indicate that the code is pending, which is a good clue to allow you to keep track of which tests have so far been implemented. It’s quite reasonable that during the development of specifications that you conceive of test but are not yet in the position to implement them, and therefore `pending()` allows you to make a note of them whilst allowing the existing tests to pass, and without loosing track of what is and isn’t implemented.
The naming conventions of Kiwi specs might seem confusing, but there is little difference between
#!objectivec
describe(…)
context(…)
it(…)
and BDD’s user stories using
#!no-highlight
story
scenario
given … when … then …
### Refactoring Tests with before…
Looking back at the code, hopefully it should be easy to see where you might insert the test code that we used in the `OCUnit` example, but I’ll show a couple of test cases below so that you can see how we can refactor the tests to remove duplication, with the help of the `beforeEach` construct.
#!objectivec
describe(@”with a stack collection”, ^{
__block DMStackCollection *stack;
beforeEach(^{
stack = [[DMStackCollection alloc] init];
});
context(@”when creating a new collection”, ^{
it(@”the collection should exist”, ^{
[stack shouldNotBeNil];
});
});
context(@”pushing an object onto the stack”, ^{
it(@”the stack count should be one”, ^{
[stack push: @”My First Stack Item”];
[[stack should] haveCountOf: 1];
});
});
…
Because we need an instance of the stack object for all of the tests, we can move the instantiation out of the test as we did in `OCUnit`, and in Kiwi, we can put the variable declaration within the `describe` block, but the assignment can go into the `beforeEach` block that appears before the first `context`. This `beforeEach` will be executed before **every** `it` block of **all enclosed `context`s**. This means that we can create an new instance for each context/test block so that one test doesn’t pollute the results of another.
Note that as Kiwi uses Objective-C Blocks to encapsulate the test logic, variables must have the [`__block` storage type](http://developer.apple.com/library/ios/documentation/cocoa/Conceptual/Blocks/Articles/bxVariables.html#//apple_ref/doc/uid/TP40007502-CH6-SW6) specified so that the variable can be assigned/modified within the inner blocks.
Within the `it` blocks, which are the tests for our expectations, we are able to take advantage of Kiwi’s expectation extensions, which try to provide a more readable syntax than the `STAssert…` macros from `OCUnit`. These work for any object derived from `NSObject`, as the expectations are added as a Category to NSObject. If we need to set an expectation on a scalar value, we need to use the `theValue` macro to wrap the scalar value before setting the expectation. e.g.
#!objectivec
[[theValue(1) should] equal: theValue(1)];
In our first test to ensure that the stack has been created, we are simply testing that the stack variable `shouldNotBeNil`.
In our second test, we push an object onto the stack, and then use Kiwi’s collection expectation `haveCountOf`. These work for any object that have a `count` property, and simplify trying to compare what would otherwise be a scalar value.
Having finalised the expectation, notice that we’ve changed `pending` to `it` so that the tests are actually executed. You should have no errors or warnings against these two tests, as we implemented the code for the stack earlier.
### Be Mindful of Assumptions
There is a disadvantage to the `beforeEach`/`afterEach` constructs – you can’t prevent their actions being applied to `it` blocks that are enclosed within the same `context` (or `describe`). Lets consider how we might want to implement the expectations for our final stack requirement, namely *the stack should contain at least 10 concurrent objects*. I’ll show the complete code but with all of the other `context`s removed so its easier to read.
#!objectivec
describe(@”with a stack collection”, ^{
__block DMStackCollection *stack;
beforeEach(^{
stack = [[DMStackCollection alloc] init];
});
/* other contexts clipped out here */
context(@”the stack should contain at least 10 concurrent objects”, ^{
const NSUInteger minimumItemCount = 10;
const NSString *itemFormat = @”Item %d”;
it(@”add minimum number of objects to the stack”, ^{
for(NSUInteger itemCount = 0 ; itemCount < minimumItemCount ; itemCount++) { [stack push: [NSString stringWithFormat:(NSString *)itemFormat, itemCount]]; } [[stack should] haveCountOf: minimumItemCount]; }); it(@"pop items from the stack", ^{ NSString *objectFromStack; NSUInteger itemCount = minimumItemCount; while ((objectFromStack = [stack pop]) != nil) { itemCount--; NSString *expectedObject = [NSString stringWithFormat:(NSString *)itemFormat, itemCount]; [[expectedObject should] equal: objectFromStack]; } }); it(@"stack should be empty", ^{ [[stack should] beEmpty]; }); }); }); Hopefully you'll see the problem here. Because a `beforeEach` applies before **every** enclosed `it` block contained by the same `context` (or `describe`), each of our expectations in this final `context` will be working from a fresh, empty stack. Whilst the first expectation will success, the other two will fail. A solution here is to wrap all the other `context`s into a `context` with a `nil` description. This `nil` description will not affect the test output, whereas a zero length string (`@""`) will. You'll then need to move the initial `beforeEach` into the new, undescribed `context`. If you run the tests again, you'll notice an interesting side effect of not cleaning up after yourself. The last `context` of our newly created `context` with no name will leave the stack variable initialised with one item, so your first test of the 'should contain a minimum' `context` will fail because there are more items in the stack than we expect. We might have expected `stack` to be `nil` at this point, but its not, because there is nothing to clean up after the other tests. The solution to this conundrum is to add a `afterEach` alongside the first groups `beforeEach`. This should be implemented as: #!objectivec afterEach(^{ stack = nil; }); This makes sure that the stack from one test cannot be inadvertently reused by a later test. Running the tests again will still fail, as our final block of tests will be failing because `stack` is `nil`. We can resolve that by using the following: #!objectivec beforeAll(^{ stack = [[DMStackCollection alloc] init]; }); afterAll(^{ stack = nil; }); Now we are only allocating `stack` at the start of this group of tests, and tidying up after ourselves once all the tests are done. One thing to learn from this is to make sure that your assumptions are right about the state of your tests or you could be creating false positives and true negatives. There is nothing so unnerving as finding a test that succeeds when it shouldn't do, because it means you've failed to test the production code correctly. ### Wrapping it up Here is the final code for the Kiwi implemented specifications: #!objectivec #import "Kiwi.h" #import "DMStackCollection.h" SPEC_BEGIN(DMStackCollectionSpecs) describe(@"with a stack collection", ^{ __block DMStackCollection *stack = nil; context(nil, ^{ beforeEach(^{ stack = [[DMStackCollection alloc] init]; }); afterEach(^{ stack = nil; }); context(@"when creating a new collection", ^{ it(@"the collection should exist", ^{ [stack shouldNotBeNil]; }); }); context(@"pushing an object onto the stack", ^{ it(@"the stack count should be one", ^{ [stack push: @"My First Stack Item"]; [[stack should] haveCountOf: 1]; }); }); context(@"popping an object off of the stack", ^{ it(@"the popped object should be the same as pushed", ^{ NSString *expectedStackItem = @"Our First Stack Item"; [stack push: expectedStackItem]; NSString *actualStackItem = [stack pop]; [[expectedStackItem should] equal: actualStackItem]; [[stack should] beEmpty]; }); }); context(@"peeking at the topmost object on the stack", ^{ __block NSString *expectedStackItem; beforeEach(^{ expectedStackItem = @"Our Topmost Stack Item"; [stack push:expectedStackItem]; }); it(@"the popped object should be the same as the last pushed", ^{ NSString *actualStackItem = [stack peek]; [[expectedStackItem should] equal: actualStackItem]; }); it(@"the stacks object count should be unaffected", ^{ NSUInteger countBeforePeek = stack.count; [stack peek]; [[stack should] haveCountOf: countBeforePeek - 1]; }); }); }); context(@"the stack should contain at least 10 concurrent objects", ^{ const NSUInteger minimumItemCount = 10; const NSString *itemFormat = @"Item %d"; beforeAll(^{ stack = [[DMStackCollection alloc] init]; }); it(@"add minimum number of objects to the stack", ^{ for(NSUInteger itemCount = 0 ; itemCount < minimumItemCount ; itemCount++) { [stack push: [NSString stringWithFormat:(NSString *)itemFormat, itemCount]]; } [[stack should] haveCountOf: minimumItemCount]; }); it(@"pop items from the stack", ^{ NSString *objectFromStack; NSUInteger itemCount = minimumItemCount; while ((objectFromStack = [stack pop]) != nil) { itemCount--; NSString *expectedObject = [NSString stringWithFormat:(NSString *)itemFormat, itemCount]; [[expectedObject should] equal: objectFromStack]; } }); it(@"stack should be empty", ^{ [[stack should] beEmpty]; }); }); }); SPEC_END Thats been a bit of a marathon explanation but I've found using unit tests, and Kiwi's specification orientated language to be helpful in developing code. It certainly makes you think harder about the code design and how you can expose things for testing. I'll write more soon and look at using Mocks and Stubs to help with breaking code dependencies and allowing for logical testing of user interface code. Application tests are not so easy on iOS, and whilst there are some UI automation tools out there (including those built into Xcode) I'm thinking that with appropriately constructed UI objects, we can apply logical testing to them without having to drive the actual user interface.

Thanks for this comprehensive explanation – really helpful. If you get around to doing asynchronous testing with Kiwi I’d love to see your approach.
Hi, the article is great, but!
You mentioned that you were not able to find viable Cucumber for iOS, what about Frank? It actually is Painless iOS Testing With Cucumber.
Make sure to check that out! http://testingwithfrank.com
Thank you for great article again.
Yes I’d actually come across Frank, but decided that it was focus on UI Automation testing. Whilst there will be a time and place for that, for my current development project I want to keep away from automation testing as long as possible. I’m finding good ways of doing logic tests on my application code and avoiding dependencies on UIKit components that require a full application environment. Once I get into integration testing, then I will look further into UI automation testing. One thing I decide on Cucumber style stories is that it doesn’t seem easy to reuse steps, so it could get quite repetitive in some situations.
Hi, the article is great, but I don’t clear usage of beforeEach/afterEach. Can you explain it to me?
Thanks!
beforeEach and afterEach allow you to provide code that is run before and after each test case in the current context and those below. This can be used to initialise variables or cleanup after each test to ensure that the tests are working with known state. It’s always a good idea for each test cas to work on a newly initialised subject, not one that is the result of a previous test, or failures in one test can cascade and cause erroneous failure reports that are harder to interpret.
thank you!
it’s interesting.
Thanks for the post, I have a small question with async testing. How do I use a future value of a block in another context ? Lets say I want to do api testing requiring some login api to be called prior to retrieve the session details which are needed for other api’s i’m going to test. How do I cater this ?
You probably need to move the acquisition of the future value into a beforeEach. But you’ll need to think about how your tests perform as it will be run before each and every test. This is where mocks come in handy. It sounds like at the moment you are writing tests that depend on a network server/service, which makes the tests brittle. If you mock the server elements, you can test the interfaces with canned responses, which is a far more valid test. You still need the futures support, so you can test for the Async result, but the result will not be delayed. You’ll also be able to test properly for failures.
Great Article, the best i found about Kiwi and BDD.
Thank you very much 🙂
Can you suggest a way to loop over a set of ‘it’ blocks in Kiwi? I saw you raised an issue for this on Kiwi github page and finally it was closed in favor of the support for SharedExample but I am unable to solve my simple for-loop use case with the SharedExample approach. For example, I have this game class I am testing, which fires generates a question (in an it block) and then generates the result of that question (in the next consecutive it block). When I have run both these blocks 10 times, I want to fire the test for generating overall result of the game. So I essentially want something like:
while (game.turnCount <= game.totalTurnCount) {
it(“test question generation”);
it(“test turn result generation”);
}
I read almost everything online related to this and since I saw you had raised this (years back though) and since I’ve loved this article of yours around Kiwi, I thought you might be able to help.
Thanks in advance!
Thank I I’m glad your found the article helpful. It’s been a long whilst since I did any kiwi/iOS development, so don’t remember the specifics. Can I suggest you look at the way the scenario is stated, if you need to test an outcome of a compound action there isn’t any need to create repetitive assertions (test them in isolation). I hope that helps.
Thank you for your reply, Dave!
I got my specific use-case solved. Thanks again for the awesome article.